

一部の画像や動画に異なるUIがありますが、CSS修正の有無によるものでプログラム部分には影響はありません。
こんにちは!みさんです。
かなりお久しぶりになりましたが、今回からゆるゆる家計簿システムを作っていきます。
使用する環境と言語
【フロントエンド】
・HTML+CSS+JavaScript
【バックエンド、その他環境】
・PHP
・MAMP
・MySQL
今回はMAMP環境、データはMySQLにphpMyAdminで作成していきます。
家計簿システムの大まかな仕様
最終的には自分だけで使うシステムになるので、今回は暫定の仕様だけを決めて開発していきます。
途中で「こんな機能もほしいな」となれば都度追加しますし、いらないと思った機能はスルーして開発していきます!
- 支出収入データを登録
- カテゴリー、支払い方法、使用カード分け登録
- 登録データやカテゴリー系の編集と削除
- 登録データのフィルター検索(月ごとやカテゴリーごとなど)
- アカウント管理機能
かなりざっくりですが、CRUD処理+αな感じで開発していきます!
静的コーディング
いきなりPHPを使いながら開発をすすめるのは、初心者の私には難しいのでまずはHTML+CSS+JavaScriptで静的コーディングをしていきます。
HTML(PHPファイル)とSassについては内容が多いので今回は割愛します。
下記から静的コーディングの完成ファイルをダウンロードできます。
それでは今後の復習も兼ねてJavaScript部分の解説をします。
収入を選択すると支払い方法の要素が表示されなくなったり、クレジットカードやスマホ決済を選択時は種類を選択する要素が表示されたりする動きをJavaScriptで作っています。
JavsScript解説
ダウンロードできるファイルには3つのJavaScriptファイルがありますが、「footer-fixed.js」はフッターの位置をコンテンツに応じて画面1番下に設置されるようにするためのライブラリファイルです。
詳細はこちら
ここでは「radio.js」「import.js」「functions.js」の3ファイルについて解説します。
まずはradio.jsの解説です。
//支出収入ラジオボタン取得
const typeChecked = document.recordInput.type;
//クレジットradioボタン取得
const creditChecked = document.recordInput.credit;
//スマホ決済radioボタン取得
const qrChecked = document.recordInput.qr;
フォームのラジオボタンを取得する変数をセットしています。
フォームのname属性を使用しているため全てのphpファイルで読み込もうとすると、フォームが存在していないページでエラーが出てしまいます。
そのため次で紹介するimport.js(全ページで読み込むファイル)から切り離して管理しています。
続いてimport.jsファイルの解説です。
//bodyタグ取得・全画面表示のときに疑似要素でレイヤーをかけるため
const body = document.getElementById('body');
//支出カテゴリーdiv要素取得
const spendingCategoryBox = document.getElementById("spendingCategoryBox");
//支出カテゴリーselect要素取得
const spendingCategory = document.getElementById("spendingCategory");
//収入カテゴリーdiv要素取得
const incomeCategoryBox = document.getElementById("incomeCategoryBox");
//収入カテゴリーselect要素取得
const incomeCategory = document.getElementById("incomeCategory");
//支払い方法div要素取得
const paymentMethodBox = document.getElementById("paymentMethodBox");
//支払い方法select要素取得
const paymentMethod = document.getElementById("paymentMethod");
//クレジットカードdiv要素取得
const creditSelectBox = document.getElementById("creditSelectBox");
//スマホ決済div要素取得
const qrSelectBox = document.getElementById("qrSelectBox");
//操作完了ボックスsection要素取得
const doneOperateBox = document.getElementById('doneOperateBox');
//操作完了ボックスpタグ要素取得
const doneText = document.getElementById('doneText');
上記import.jsには各要素を取得する変数を格納しています。
それでは最後にfunctions.jsファイルのプログラムです。
/*=====================================================
支出・収入radioボタンで表示するカテゴリー要素を切り替えるイベント
======================================================*/
const onRadioChangeType = (number) => {
  typeChecked[number].checked = true; //選択したradioボタンをcheckedとする

  //ポイント②!支出収入の切り替えが複数回行われたときにすでに1度選択した項目を初期値に戻す
  spendingCategory.selectedIndex = 0; //支出カテゴリーを初期値に戻す
  incomeCategory.selectedIndex = 0; //支出カテゴリーを初期値に戻す
  paymentMethod.selectedIndex = 0; //支払い方法を初期値に戻す
  creditChecked[0].checked = true; //クレジット選択を初期値に戻す
  qrChecked[0].checked = true; //スマホ決済選択を初期値に戻す

  //支出radioボタンが選択されたら
  if (typeChecked[0].checked) {
    paymentMethodBox.classList.add("show"); //支払い方法div要素にshowクラスを付与で表示
    spendingCategoryBox.classList.add("show"); //支出カテゴリーdiv要素にshowクラスを付与で表示
    incomeCategoryBox.classList.remove("show"); //収入カテゴリーdiv要素にshowクラス付与で非表示

  //収入radioボタンが選択されたら
  } else if (typeChecked[1].checked) {
    paymentMethodBox.classList.remove("show"); //支払い方法div要素からshowクラスを削除して非表示
    spendingCategoryBox.classList.remove("show"); //支出カテゴリーdiv要素からshowクラスを削除して非表示
    incomeCategoryBox.classList.add("show"); //収入カテゴリーdiv要素にshowクラス付与で表示
    creditSelectBox.classList.remove("show"); //ポイント①!!クレジット選択div要素からshowクラスを削除して非表示
    qrSelectBox.classList.remove("show"); //ポイント①!!スマホ決済選択div要素からshowクラスを削除して非表示
  }
}

/*====================================
クレジットカードorスマホ決済選択時のイベント
=====================================*/
const hasChildSelect = (methodValue, parentElement, checkedItem) => {
  if (paymentMethod.value === methodValue) {
    parentElement.classList.add("show"); //クレジットorスマホ決済選択div要素にshowクラス付与で表示
  } else if(paymentMethod.value !== methodValue){
    parentElement.classList.remove("show"); //クレジットorスマホ決済選択div要素からshowクラス削除で非表示
    checkedItem[0].checked = true; //選択を初期値に戻す
  }
}
全部で2つの関数を格納しています。まずは上部の「onRadioChangeType関数」です。
この関数は「支出」「収入」どちらが選択されているかで、その下の関連要素の表示&非表示を切り替える関数です。
if (typeChecked[0].checked)…以降のフローチャート的なものも載せておきます↓
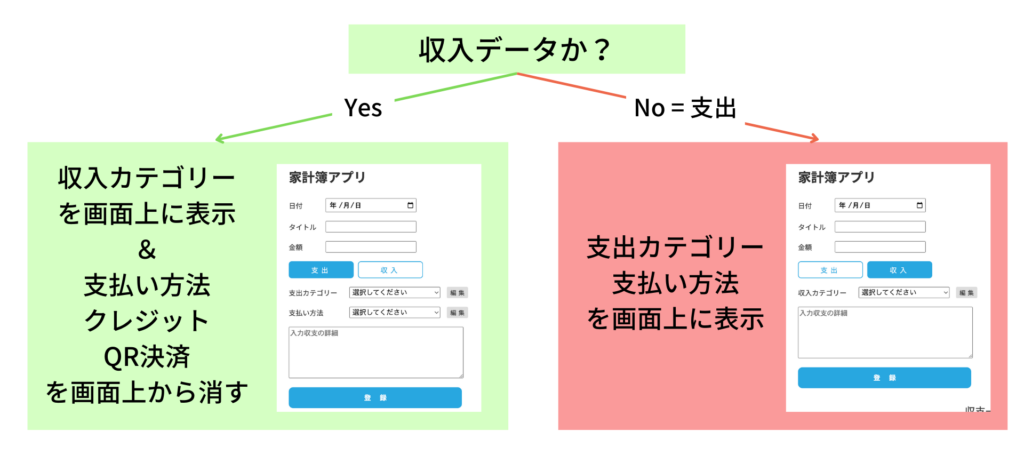
そしてこのif文の中のポイントは、else if文(収入が選択されている場合)でクレジットやスマホ決済選択のdiv要素も非表示にしているところです。支払い方法を非表示にする処理だけでOK!としてしまうと、以下のように支払い方法の選択部分は非表示になりますが、クレジットやQR決済の選択要素が残ってしまいます。
そのため支払い方法でクレジットやスマホ決済が選択されているいないに関わらずdiv要素を非表示にする処理を記述しています。
別の方法で、クレジットやスマホ決済が選択されている状態で収入に切り替えられたら要素を非表示にするというプログラムを記述することもできますが、if文内のネストが深くなってしまうので今回はこの方法で記述しました。
そしてこの関数内2つ目のポイントです。
if文の上部に記述している初期化処理です。これは支出と収入の切り替え時にすでに入力していた内容が残る挙動を解消する処理です。
この処理をコメントアウト等した場合は以下のような挙動になります。
支出でクレジットを選択したまま切り替えを繰り返すと、詳細選択要素が表示されなくなります。この挙動を改善するためには以下を追記します。
//以下をコメントアウトor削除
spendingCategory.selectedIndex = 0; //支出カテゴリーを初期値に戻す
incomeCategory.selectedIndex = 0; //支出カテゴリーを初期値に戻す
paymentMethod.selectedIndex = 0; //支払い方法を初期値に戻す
creditChecked[0].checked = true; //クレジット選択を初期値に戻す
qrChecked[0].checked = true; //スマホ決済選択を初期値に戻す

//以下を追加
if (typeChecked[0].checked && paymentMethod.value === "2") {
  creditSelectBox.classList.add("show");
} else if (typeChecked[0].checked && paymentMethod.value === "3") {
  qrSelectBox.classList.add("show");
}
現状では、タイトルや金額の初期化処理は行っていません。これはフォームの上から入力し支出or収入を押した際に初期化処理が走ってしまうためです。(以下動画参照)
上部の関数の解説は以上になります。
続いて下部の「hasChildSelect関数」の解説です。この関数は支払い方法でクレジットやスマホ決済が選択されたときにさらに詳細な選択要素を表示させるための関数です。
/*====================================
クレジットカードorスマホ決済選択時のイベント
=====================================*/
const hasChildSelect = (methodValue, parentElement, checkedItem) => {
  if (paymentMethod.value === methodValue) {
    parentElement.classList.add("show"); //クレジットorスマホ決済選択div要素にshowクラス付与で表示
  } else if(paymentMethod.value !== methodValue){
    parentElement.classList.remove("show"); //クレジットorスマホ決済選択div要素からshowクラス削除で非表示
    checkedItem[0].checked = true; //選択を初期値に戻す
  }
}
どちらも同じような処理なので引数を用いた関数にしています。
支払い方法のvalueによって関連要素にクラスを付与・削除をすることで表示と非表示を切り替えています。
HTML側の記述を見てみましょう。
<select name="payment_method" id="paymentMethod" onchange="hasChildSelect('1', creditSelectBox, qrChecked);hasChildSelect('2', qrSelectBox, creditChecked);">
支払い方法のselect要素のonchangeにイベントとして登録しています。ここで少し手間なのが一気に設定できない点です。
クレジット選択がされたときと、スマホ決済が選択されたときの2パターンの引数を設定し登録する必要があります。
以上が全てのJavaScriptのプログラムです。
最後に
ここまでの静的コーディングが終えると、支出収入の切り替えや、支払い方法によって更に選択項目が現れるなどの動きが出るようになります。
次回はデータベースを用意して入力内容が実際にデータベースに登録されるように実装していきます。
最後までお読みいただきありがとうございました。


コメント